
Activating an eSIM is fairly straightforward, but when a Samsung phone doesn’t follow the exact same steps as a Pixel or Xiaomi device, small differences in menu names can cause confusion. Switching between a physical SIM and an eSIM (or managing both at the same time) can make things even less intuitive.
The biggest hurdle is often understanding the difference between installing and activating an eSIM. You might successfully add the profile to your device, only to realize you still can’t connect.
Our quick setup guide simplifies the process. Not only will we show you how to activate an eSIM on Android, but also how the process differs by device. You’ll also learn some quick tips to troubleshoot activation issues and the necessary configuration steps to activate a travel eSIM.
How to activate an eSIM on Android
In addition to turning on the eSIM, you’ll also need to make sure you’ve enabled mobile data on your eSIM. Here are the steps to follow.
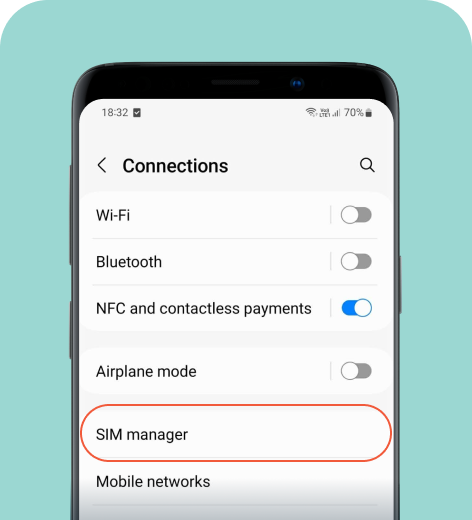
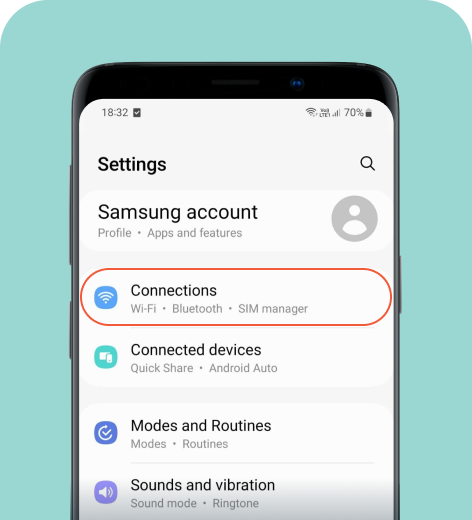
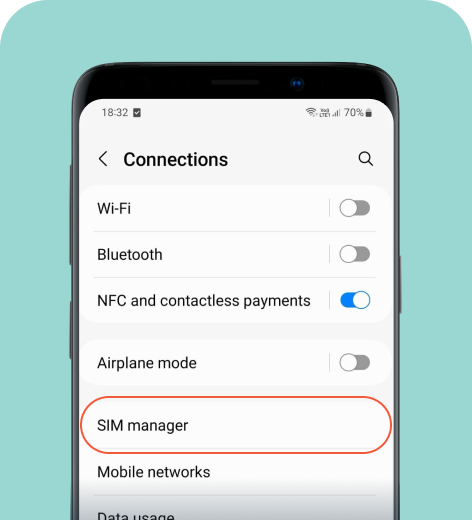
On Samsung

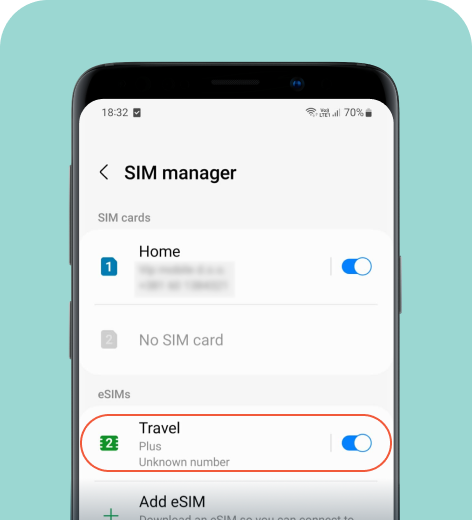
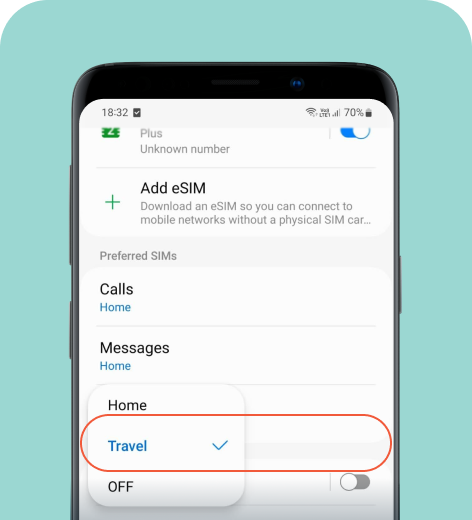
You can toggle your primary line and eSIM on and off as needed. If your eSIM doesn’t include a phone number, you can enable it for mobile data only and keep your primary line for calls and messages. You can set these preferences in the SIM manager menu under Preferred SIMs, as shown in the last step above.
HOT TIP
If you experience activation issues, restarting your phone or updating your phone’s system can fix glitches. If your phone connects but the internet doesn’t work, you may need to update your network settings. Note that it might take a few minutes for your eSIM to fully activate upon arrival.
On Google Pixel
To activate your eSIM on Google Pixel:
- Go to Settings > Network & Internet > SIMs.
- Choose the specific eSIM you want to activate from the list, and toggle Use this SIM on. Next, turn on the Roaming option to enable it.
- Set which line you want to use for data, calls, and SMS in the SIMs menu.
On Xiaomi
To activate your eSIM on a Xiaomi device:
- Go to Settings > SIM cards & mobile networks and activate the Use eSIM option.
- Navigate Manage eSIM and find your data plan. Toggle the switch on.
- From this menu, you can enable mobile data and set data roaming preferences to Always (or For exceptions to limit use to certain apps). This ensures your travel eSIM data works abroad.
HOT TIP
For many Xiaomi models, enabling eSIM functionality will disable the SIM 2 slot (the physical tray). You can usually use SIM 1 (physical SIM) and an eSIM simultaneously, but not two physical SIMs and an eSIM.
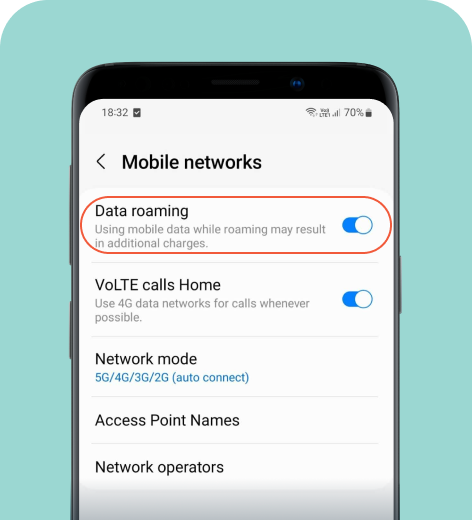
How to enable data roaming
If you plan to use a travel eSIM for your trips, you’ll also need to enable data roaming to connect to the internet while abroad. Here’s how to do it if it isn't automatically enabled.
And that’s it! You’re ready to use your eSIM on your trip.
On Google Pixel
- Go to Settings > Network & Internet > SIMs.
- Select your travel eSIM and toggle Roaming on.
On Xiaomi
- Go to Settings > SIM cards & mobile networks.
- Select your travel eSIM and toggle Data roaming to Always.
The difference between eSIM installation and activation
Many eSIM guides blur the line between installation and activation, but these are two separate processes. Installing an eSIM involves purchasing a data plan and adding the eSIM profile to your phone. You typically do this by scanning a QR code or manually entering details as instructed by your provider. Some eSIM carriers, like holiday.com, streamline setup by letting you install eSIMs via their apps.
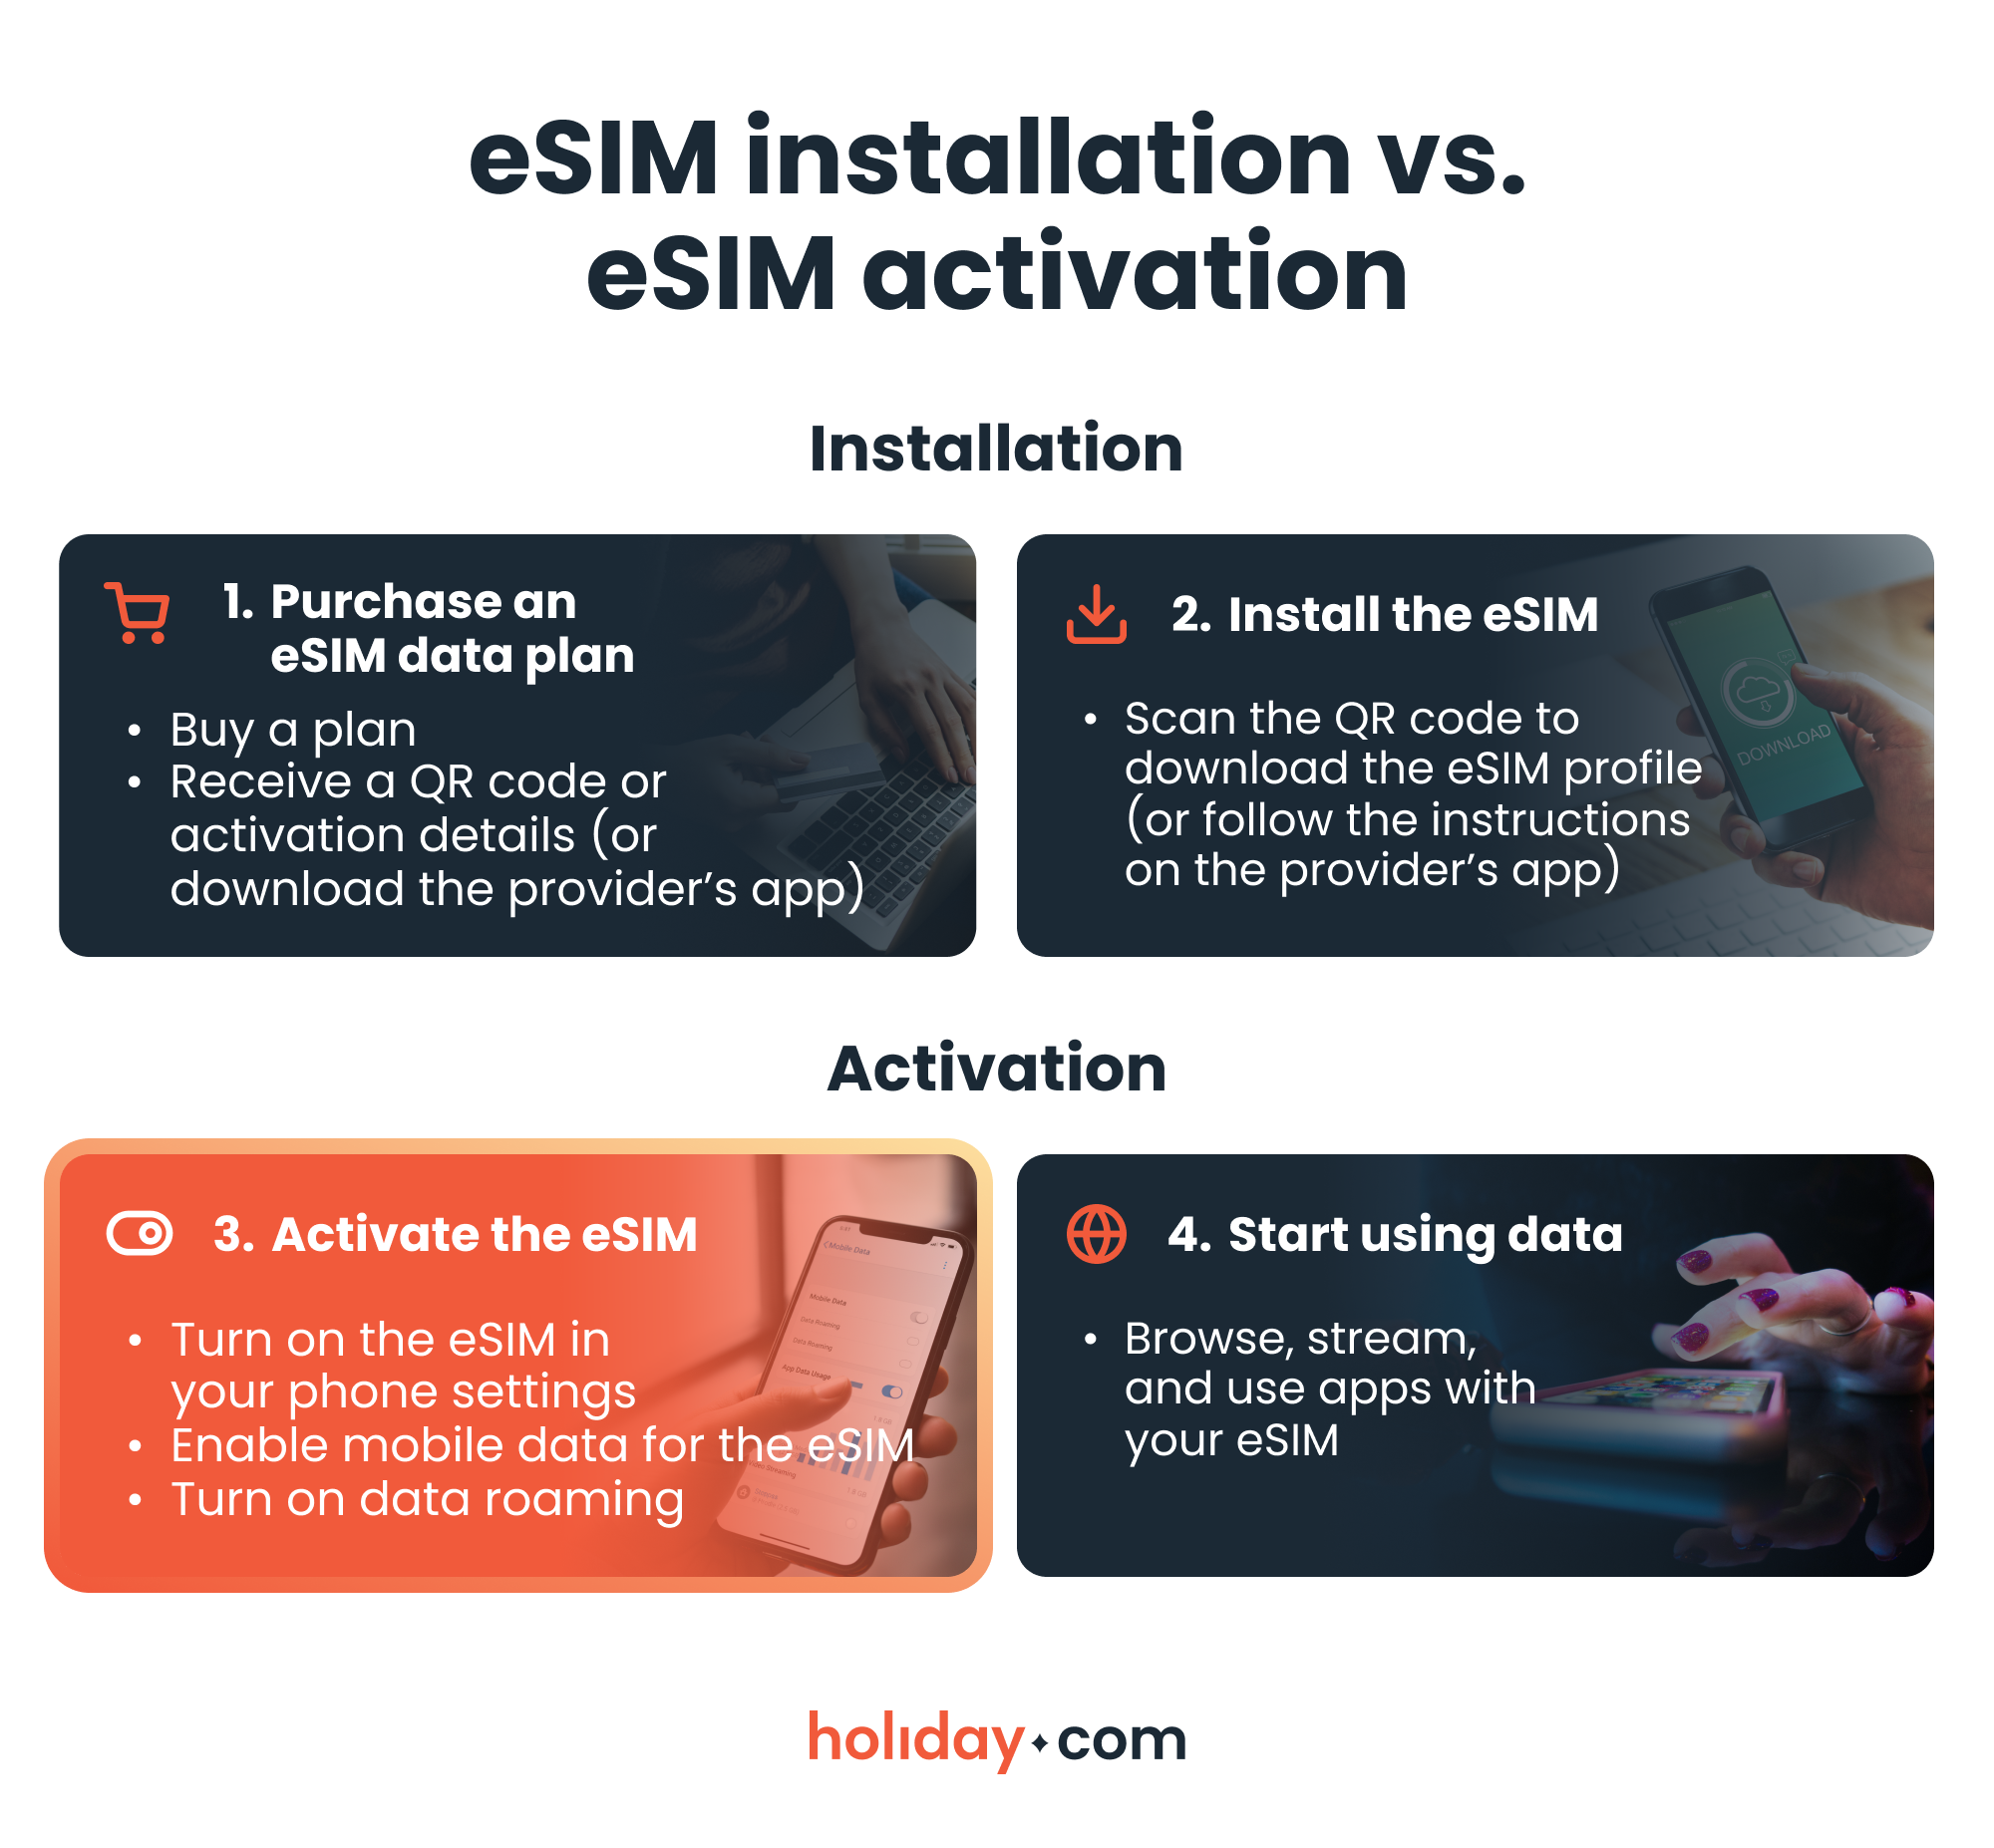
Once you’ve installed the eSIM, you can activate it through your phone’s settings. You simply turn on the eSIM, enable it for mobile data, and switch on data roaming if you plan to use it for international travel. You can install an eSIM without activating it, which is why you may see the profile in your settings but still have no connection.
HOT TIP
Travel eSIMs like holiday.com activate only once you arrive at your destination and connect to a supported local network. You can install the eSIM on your Android phone beforehand, but if you try to activate it before reaching your destination, your device may show an “Activating…” or “No service” error until you reach your destination.
Activating an eSIM on Android is quick and easy
Activating your eSIM on Android only takes a few taps. The key is understanding the difference between installing the profile and turning on your data, while keeping in mind the subtle menu differences across devices.
If you’re preparing for an upcoming trip and want an eSIM that’s easy to install, activate, and manage, download the holiday.com app. You can install the eSIM directly from the app and activation only takes a few minutes.
FAQ
-
Do I need Wi-Fi to activate an eSIM?

You need a stable Wi-Fi connection during the installation process, but eSIM activation requires a mobile network connection. To connect, you’ll need to enable your eSIM for mobile data.
-
How do I switch between an eSIM and a physical SIM?
Go to your SIM settings and choose which line to use for mobile data, calls, and texts. You can switch at any time without removing the physical SIM.
-
Can I transfer an eSIM?
It depends on the provider. Some carriers let you reinstall your eSIM on a different device using your account credentials. Others don’t support transfers, which means you’ll need a new eSIM for a new device.
-
How do I convert a SIM to an eSIM on Android?
If your carrier supports direct conversion, you may be able to do so via your carrier’s app. If your phone supports it, you can go to your SIM settings and select Convert to eSIM. Some carriers, though, might require you to scan a QR code or visit a physical store. Note that you cannot convert your eSIM back to a physical SIM without requesting a new one from your provider.
-
Can I activate an eSIM immediately?
Not always. Travel eSIMs usually activate only when you arrive at your destination and connect to a local supported network. You can, however, install an eSIM before your trip so that you’ll be ready to connect the moment you land.
About our author

You might also be interested in...
-
 eSIM
eSIMHow to turn off an eSIM: Quick guide and tips in 2026
Turning off your eSIM can be helpful in many situations. You may want to disable a travel data plan, switch to another SIM, or avoid roaming charges. The process is quick and you can do it from your p...
 Ana Marković
 06.16.2026
 -
 eSIM
eSIMWhat is an ICCID number and why does it matter?
Knowing how to find your integrated circuit card identifier (ICCID) number makes it easier to manage devices that use SIM cards and eSIMs. When things are going smoothly, you hardly have to think abou...
Sarah Kirton
06.16.2026 -
 eSIM
eSIMeSIM vs. data roaming: Which is better for international travel?
Staying connected while traveling is easier than ever, but the way you access mobile data can make a big difference in your experience and costs. Two popular options are purchasing a travel eSIM or re...
Dawn Prevete
06.09.2026 -
 eSIM
eSIMeSIM vs physical SIM: Pros, cons, and which one is right for you?
An eSIM (embedded SIM) is the digital equivalent of a physical SIM card built into your device. It allows you to activate and manage cellular plans entirely through software, meaning there’s nothing...
Ivana Shteriova
06.08.2026 -
 eSIM
eSIMHow to delete data usage history in 2026: A step-by-step guide
You can erase the data usage counters on your phone, but you can’t permanently erase your carrier’s system-level logs. Deleting your local statistics so the counter returns to zero takes only a fe...
Ana Marković
06.08.2026 -
 eSIM
eSIMDoes an eSIM drain your battery? Fact versus fiction
While eSIMs use the same hardware as physical SIM cards and consume virtually the same power, there are times when you might notice your device’s battery draining faster than usual. Most often, it�...
Sarah Kirton
06.08.2026