
eSIM technology offers a simpler way to access mobile data at home or abroad. Whether you’re looking to avoid expensive roaming fees on your trip or you just want to separate your private and work lines, you can download a data plan directly onto your Android device in minutes.
That said, you may wonder what the different eSIM installation methods are. Also, device compatibility may vary by phone model, region, and carrier restrictions, making it difficult to know what to expect.
We’ll walk you through the entire process step by step, from checking whether your device supports eSIM to covering all installation methods. You’ll learn what information you need beforehand and how to avoid common mistakes that can slow you down.
Before you start
Before you can install an eSIM, it’s necessary to confirm a few things to avoid surprises.
- Check device compatibility. Dial *#06# and look for an EID (Embedded Identity Document) number. If there is one, your device supports eSIM. You can also find an EID number by navigating to Settings > About phone > Status information.
- Ensure your phone is carrier-unlocked. To use travel eSIMs or eSIMs from another provider, your phone must be carrier-unlocked. You can check with your carrier or your device settings. If multiple networks are available, your phone is likely unlocked.
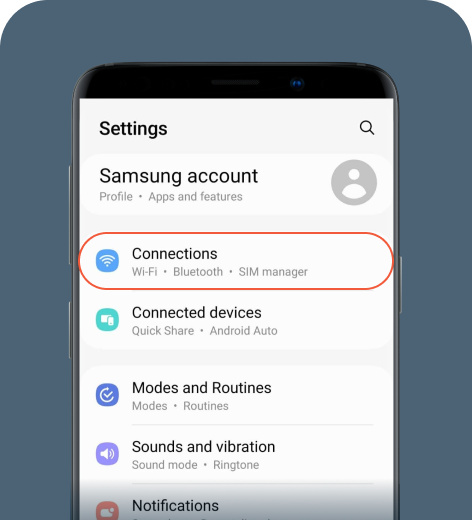
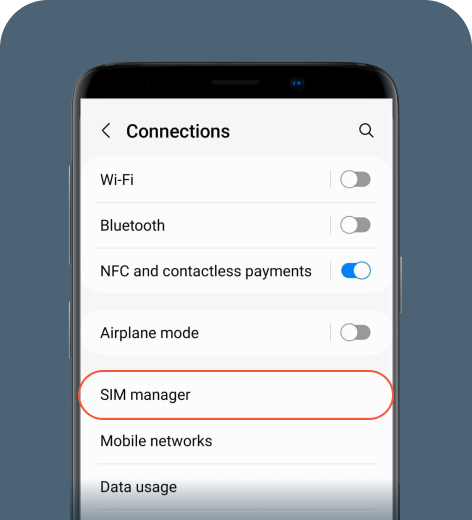
- Samsung: Go to Settings > Connections > Mobile networks
- Pixel: Go to Settings > Network & internet > SIMs
- Xiaomi: Go to Settings > SIM cards & mobile networks.
- Use a stable Wi-Fi connection. Ensure you have access to a reliable Wi-Fi connection to download your eSIM profile.
Quick Android eSIM setup guide
Depending on the provider, there are different ways to set up an eSIM on Android: using a QR code, manually entering activation details, or completing the process through the provider’s app. We’ll show you the steps for each method.
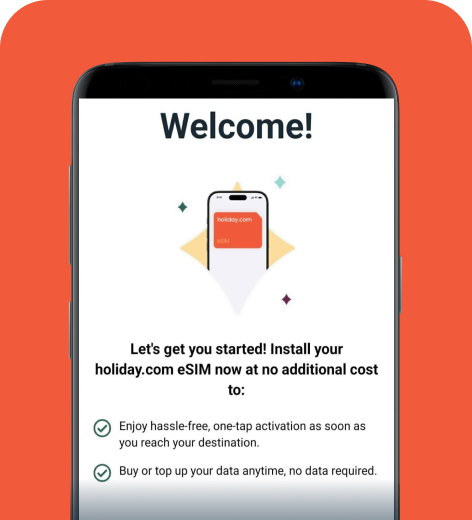
Using the carrier or provider app
Using an app to install an eSIM is often the easiest option, as it guides you through each step and handles most of the setup automatically. Below, we illustrate the process using the holiday.com app, but most eSIM apps follow a very similar flow.
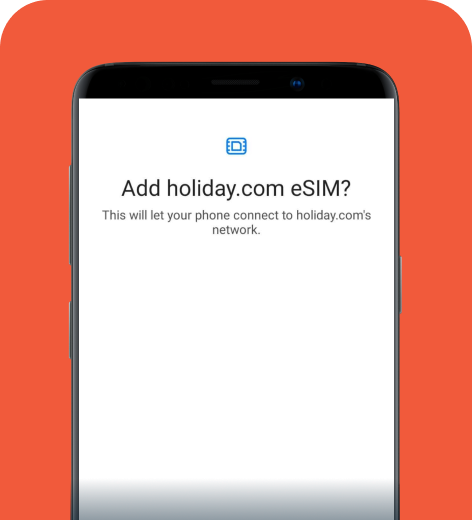
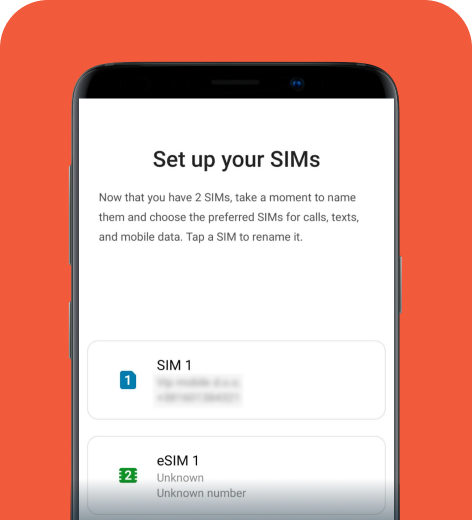
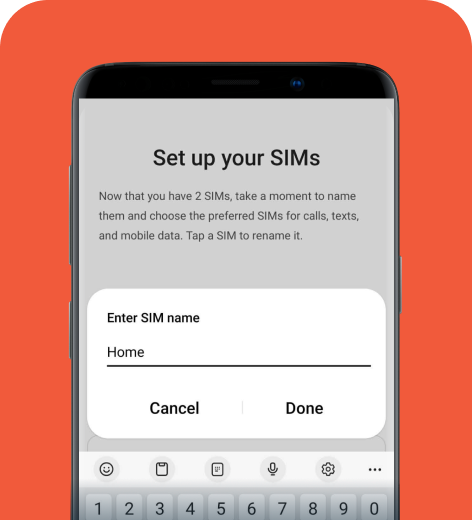


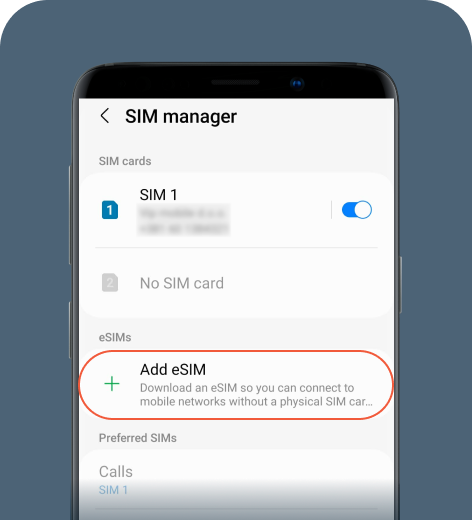
In addition to not having to deal with QR codes, installing an eSIM via an app streamlines many steps, including assigning lines for calls and data. That said, you can always change these settings by navigating to SIM manager on Samsung, SIMs on Pixel, or SIM cards & mobile networks on Xiaomi.
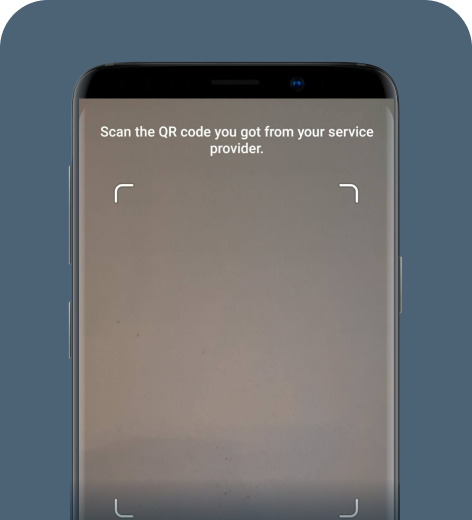
Using a QR code
To install an eSIM with a QR code, you’ll use your phone’s built-in SIM setup tools. Your eSIM provider will supply a QR code after you request an eSIM or purchase a travel plan.
It’s important to have the QR code ready on another device or printed out. You won’t be able to scan it using the same phone you’re setting up. Also, you can scan most eSIM QR codes only once, so make sure everything is ready before starting the installation.
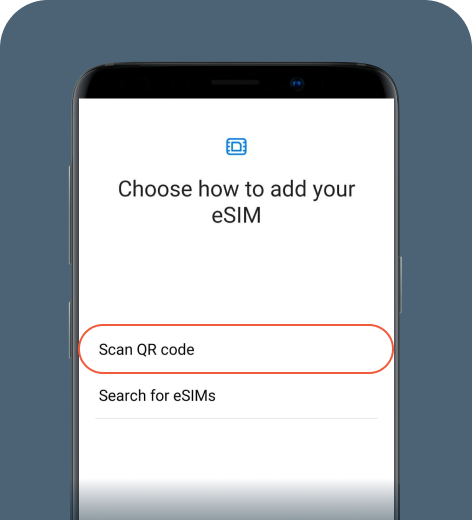
Now you can follow the on-screen prompts to confirm and install the eSIM profile.
HOT TIP
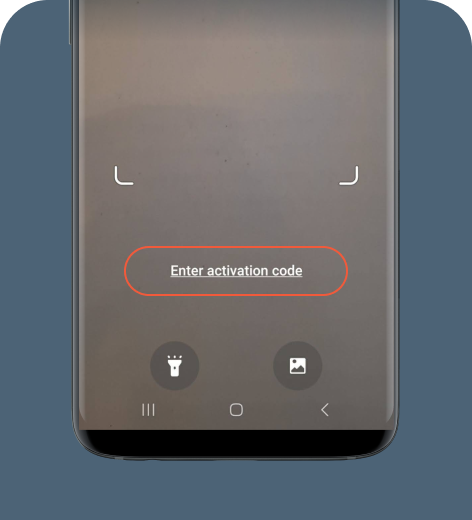
If you don’t have a spare device to display the original QR code, you can also use a screenshot for scanning. During installation, tap on the image icon in the lower-right corner of the QR code scanner to upload the screenshot.
Using an activation code
If your provider doesn’t offer an app, doesn’t provide a QR code, or the QR code setup isn’t working, you’ll receive activation details to complete the setup.
For a manual eSIM setup, you’ll need:
- Subscription Manager Data Preparation Plus (SM-DP+) server address (for example: smdp.holiday.com).
- Activation code.
- Confirmation code (if required).
You’ll need to enter these details into your Android device to complete the installation.
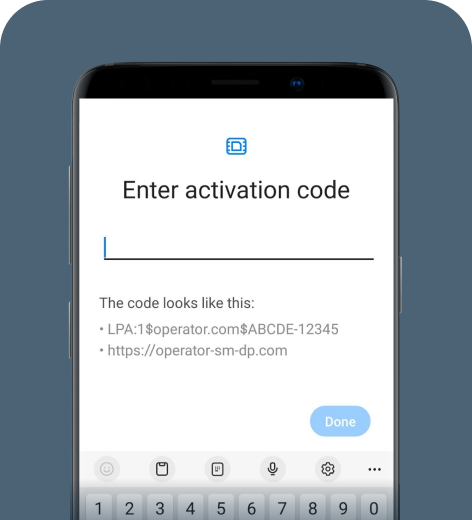
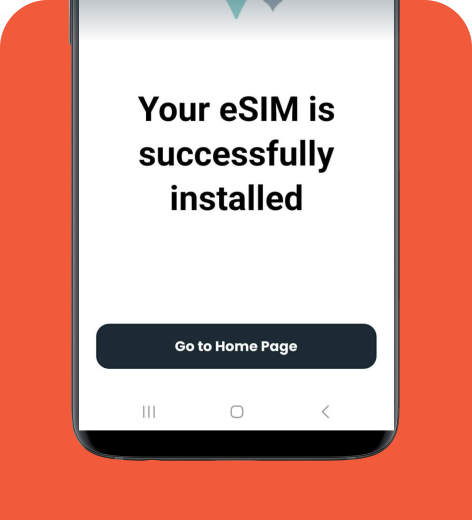
Once you’ve entered activation details, follow the on-screen prompts. Your phone will start downloading and installing the eSIM profile, which may take a few minutes. When the installation is complete, tap Done, and you’re all set!
Device-specific UI differences
The process of installing an eSIM is similar for most Android phones, though some menu names may vary.
Google Pixel
- Go to Settings > Network & Internet.
- Select SIMs > Add or Download eSIM.
- You’ll find the QR code scanner and manual entry options here.
Xiaomi
- Go to Settings > SIM cards and mobile networks.
- Select Add eSIM or Use eSIM.
- You can also type “SIM” in the search bar to find the settings.
HOT TIP
Xiaomi devices only allow you to use an eSIM with one physical SIM. If you have two physical SIM cards, you’ll have to disable one to add an eSIM to your phone.
eSIM installation troubleshooting for Android
Most eSIM installation issues are QR code problems, though a poor network connection or reaching your eSIM profile limit can also disrupt the process. Here’s what you can do.
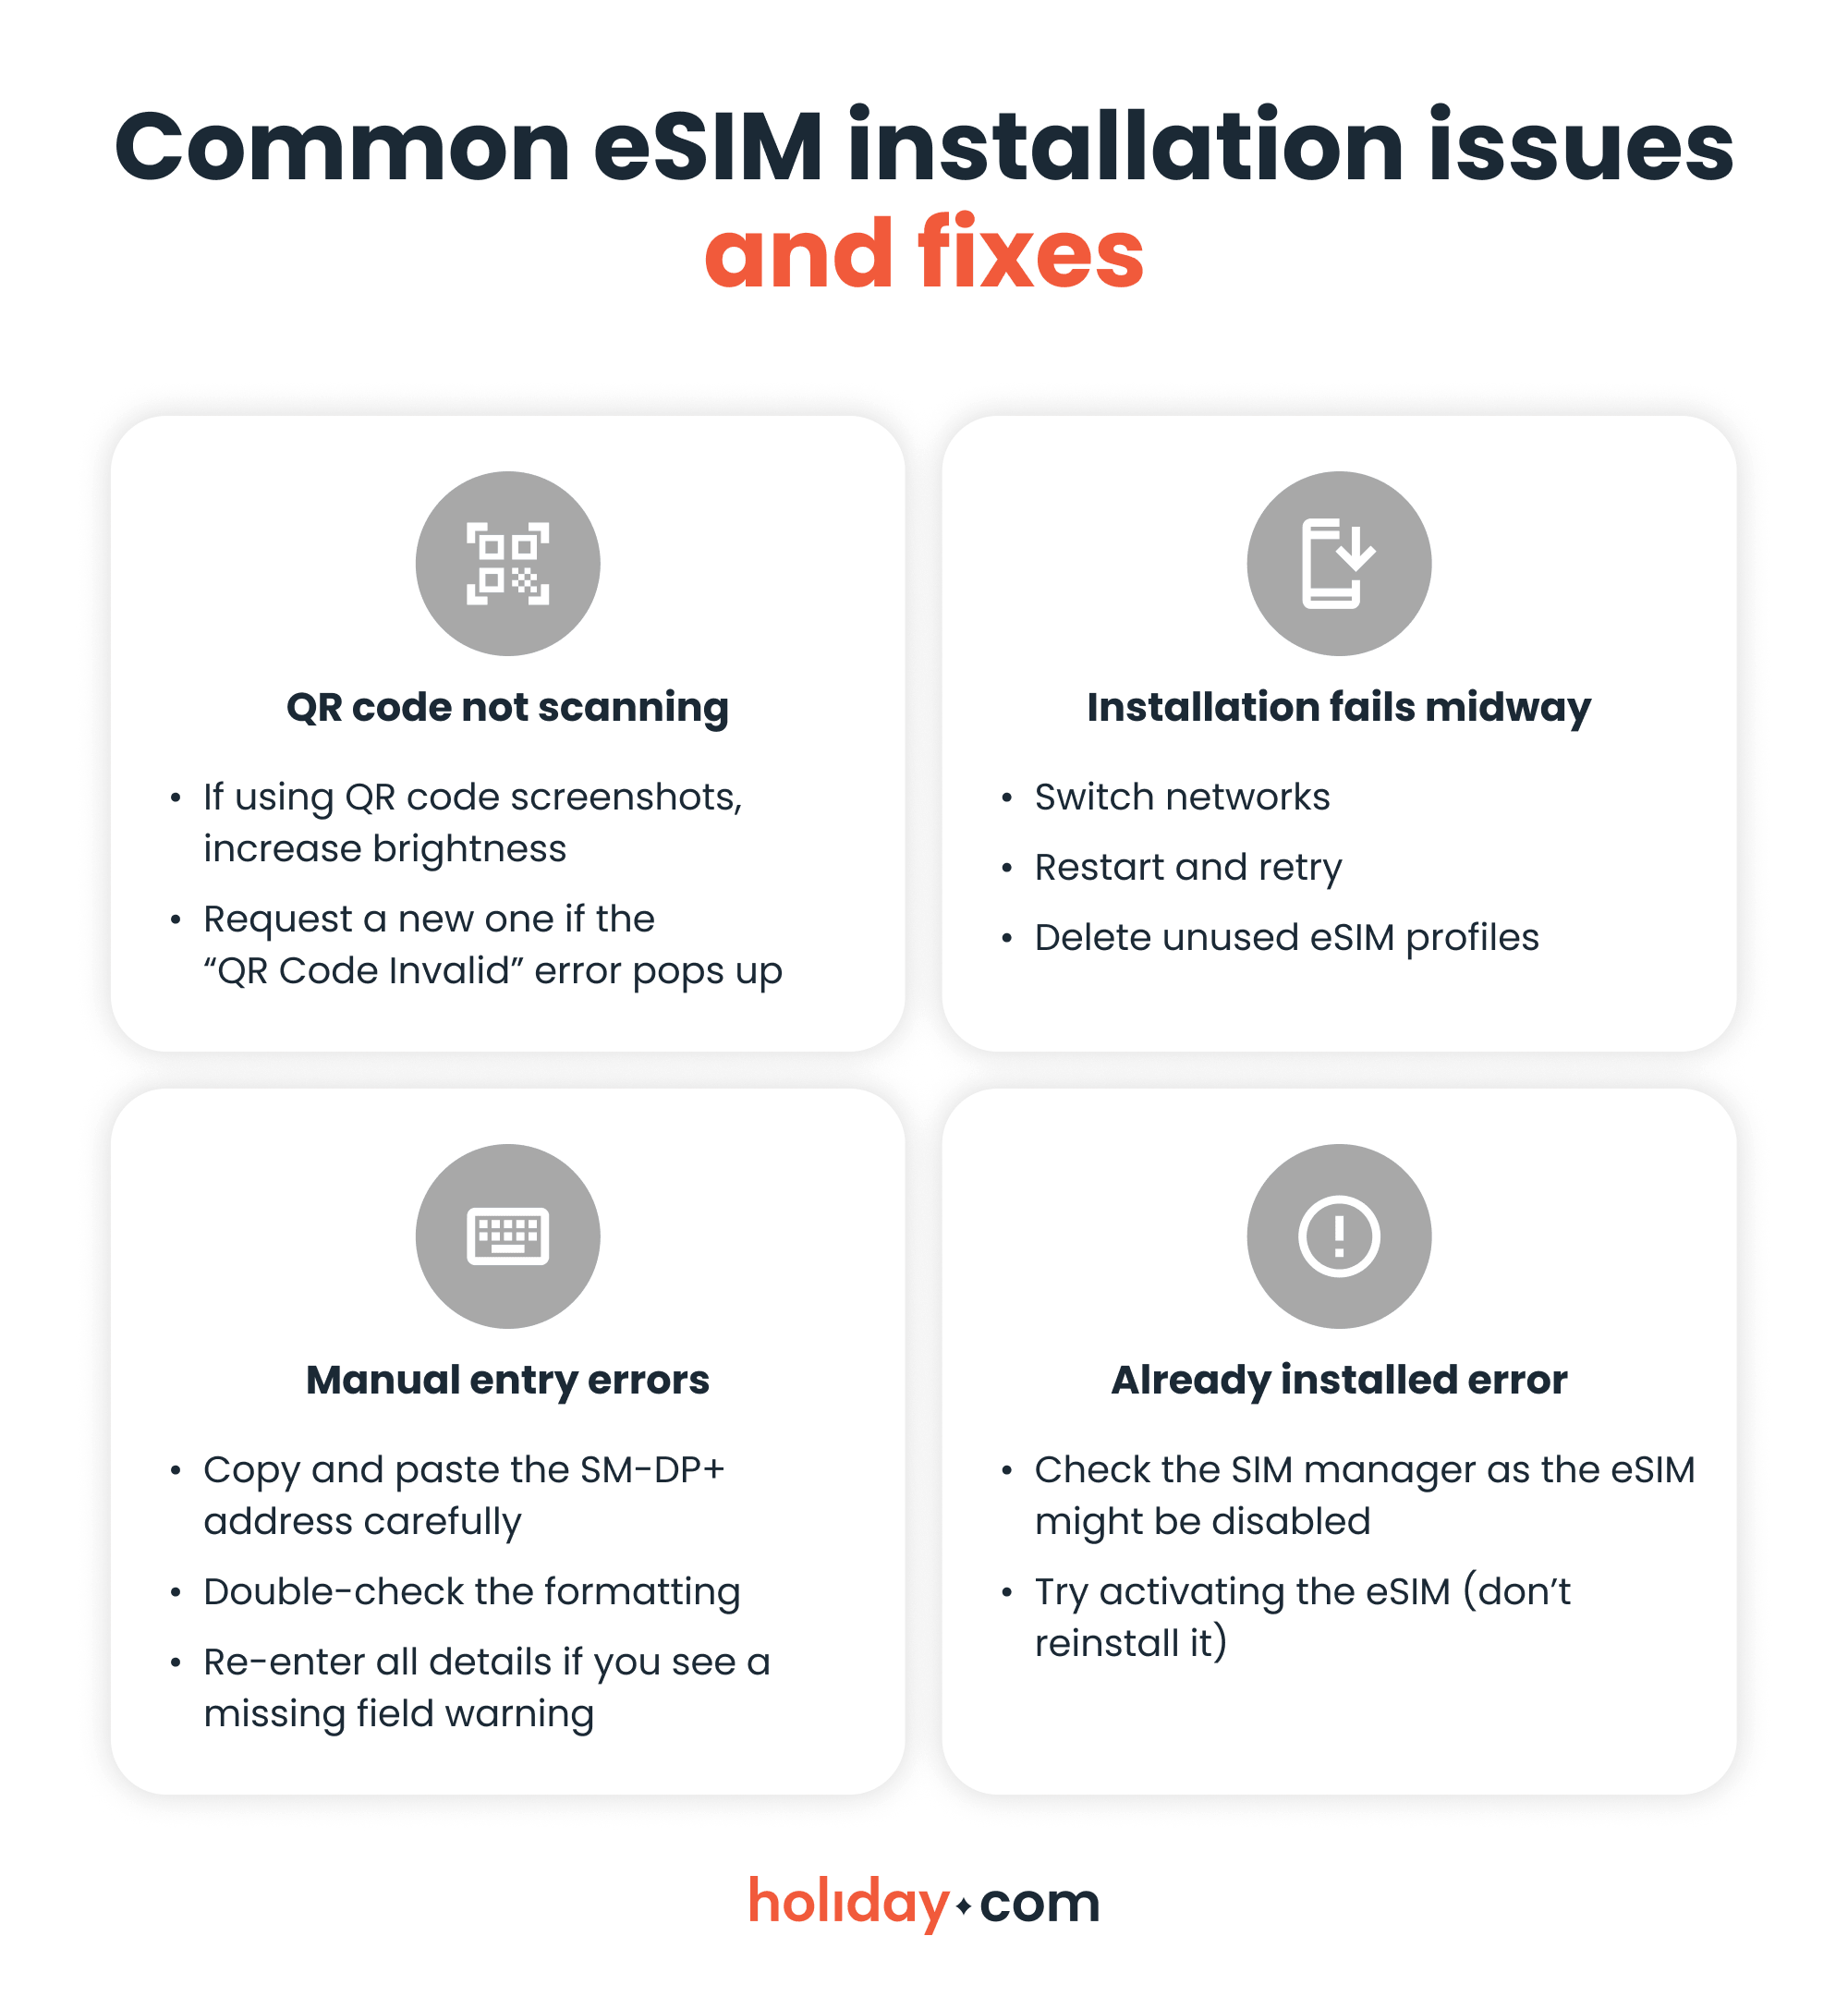
Many users attempt to reinstall their eSIM when all they need to do is activate the eSIM by turning on mobile data. If the problem persists, it’s best to contact your eSIM provider.
You’re ready to use your Android eSIM
Although there are several ways to install an eSIM on Android, using a provider’s app saves time and handles most of the technicalities for you. If no app is available, you can still set up an eSIM manually in a few steps. And if something goes wrong, it helps to know that issues are temporary and you can fix them with a bit of troubleshooting.
FAQ
-
How can I get the QR code for eSIM?

You receive the QR code after purchasing an eSIM plan from a provider. You’ll typically get it via email, though you may also be able to see it in your account or app. Travel eSIM providers like holiday.com also allow direct in-app installation without a QR code.
-
Why can't I add an eSIM to my Android?
Your phone may not support eSIM or it might be locked to a specific carrier. If you already have multiple eSIMs, you may have exceeded your eSIM profile limit. Most Android phones support five or more eSIMs, but you can only have up to two active at the same time.
-
Does Lycamobile support eSIM?
Lycamobile offers eSIM support in select countries. You’ll need to check your local Lycamobile website or contact support to confirm if eSIM is available where you are.
-
Is eSIM activation free?
It depends on the provider. Many eSIM providers include activation at no extra cost, while some carriers may charge a small setup fee. Always check pricing before purchase.
-
How do I activate the eSIM on my phone?
After installation, go to SIM settings and turn on your eSIM. Make sure it’s enabled for mobile data and turn on data roaming if you’ll be using it for travel. You can activate your travel eSIM only once you arrive at your destination.
-
Which Android phones allow eSIM?
Most newer Android devices support eSIM, including Google Pixel (Pixel 3 and newer), Samsung Galaxy S20 and later, Galaxy Z series, and some newer Xiaomi models. However, availability depends on region and carrier.
About our author

You might also be interested in...
-
 eSIM
eSIMHow to turn off an eSIM: Quick guide and tips in 2026
Turning off your eSIM can be helpful in many situations. You may want to disable a travel data plan, switch to another SIM, or avoid roaming charges. The process is quick and you can do it from your p...
 Ana Marković
 06.16.2026
 -
 eSIM
eSIMWhat is an ICCID number and why does it matter?
Knowing how to find your integrated circuit card identifier (ICCID) number makes it easier to manage devices that use SIM cards and eSIMs. When things are going smoothly, you hardly have to think abou...
Sarah Kirton
06.16.2026 -
 eSIM
eSIMeSIM vs. data roaming: Which is better for international travel?
Staying connected while traveling is easier than ever, but the way you access mobile data can make a big difference in your experience and costs. Two popular options are purchasing a travel eSIM or re...
Dawn Prevete
06.09.2026 -
 eSIM
eSIMeSIM vs physical SIM: Pros, cons, and which one is right for you?
An eSIM (embedded SIM) is the digital equivalent of a physical SIM card built into your device. It allows you to activate and manage cellular plans entirely through software, meaning there’s nothing...
Ivana Shteriova
06.08.2026 -
 eSIM
eSIMHow to delete data usage history in 2026: A step-by-step guide
You can erase the data usage counters on your phone, but you can’t permanently erase your carrier’s system-level logs. Deleting your local statistics so the counter returns to zero takes only a fe...
Ana Marković
06.08.2026 -
 eSIM
eSIMDoes an eSIM drain your battery? Fact versus fiction
While eSIMs use the same hardware as physical SIM cards and consume virtually the same power, there are times when you might notice your device’s battery draining faster than usual. Most often, it�...
Sarah Kirton
06.08.2026